For this demo we wanted to unwrap and texture something harder than just a box, so we decided to make a crate instead, this will have many more polygons to cover and texture, along with creating a more intricate net.
First of all we had to make the shape of the crate, so to do this, you make the square and then make it a 'editable poly' from here (ensuring that it is all highlighted and that polygon is on, on the drop down) you have to inset smaller squares into our cube
Once done, we then have to extrude these inset squares, and so I set it to -2 so that it would inverse the squares and take it away from the cube. After this we then made a thin rectangular cuboid, the length of the square and set it diagonally in the crate, after placing it in place and ensuring it is at a 45% we then adjusted the length accordingly so that it would be the full length of the inner-square
To save on ram space, we deleted some of 'invisible' sides of the smaller rectangle. This was done by selecting the rectangle and then right-clicking it you then select 'isolate'. this will then only show the rectangle, make it a convertible poly, select polygon on the drop down and then just select sides that you wont see and delete them. Go back to the polygon tab, and select your plank, right-click it and choose 'attach' you then click your box. This will mess up your pivot, so you adjust this by selecting
utilities (hammer on the right hand side tab) and then select reset 'reset xform'. after that go onto modifier right clikc xform and select comapct all
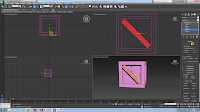
you then show the UV Editor, one the window is up, select all of your shape and then choose "flatten Mapping" this will explode the net, you want to remove everythign from the area,
this is done by selecting the object and moving it out of the checkered area, ensuring that you have select by element on (next the the red square). Once done have edge selected (red triangle) and select the edge of one of the SQUARES right click this-and select stitch, do this floor all the squares and the long plan
You can then move the squares back in, select one and put it into the corner, right-click the shape and select copy, you then go to all the squares and select paste (do the same with the larger squares.) Move everything together out of the screen, and bring back in the large squares and scale them to the size of the checked area, and then bring in the normal squares scaling them to the same size as the inner of the large ones and then just the plank.
Then save the net put it into the Photoshop and apply a texture to the shape, I put a burn effect on the inner square where the creases would be.
Once done ave the net and bring it back into the mapping.

 Once done, we then have to extrude these inset squares, and so I set it to -2 so that it would inverse the squares and take it away from the cube. After this we then made a thin rectangular cuboid, the length of the square and set it diagonally in the crate, after placing it in place and ensuring it is at a 45% we then adjusted the length accordingly so that it would be the full length of the inner-square


No comments:
Post a Comment